
Recently, I’ve been attempting to record some tutorials on my MBP. All of those tutorials involve screen recording and the process has been more painful than I’d expected. In the interest of good science I “changed some settings and recorded my results”. What are the best OBS settings for your Macbook Pro? Read on to find out!
tl;dr
Set your OBS Base and Output settings to 1920×1080, bitrate to 40,000, use display capture for your input source and edit in a 1920×1080 project in Final Cut pro.
Specs of my machine

My Macbook OBS workflow
In OBS, I used the “Display Capture” source. I tried using the “Window Capture” source but this resulted in a lot of screen flicker. From there I imported the recording in to Final Cut Pro, made edits, and then exporeted straight to Youtube.
Static OBS Settings
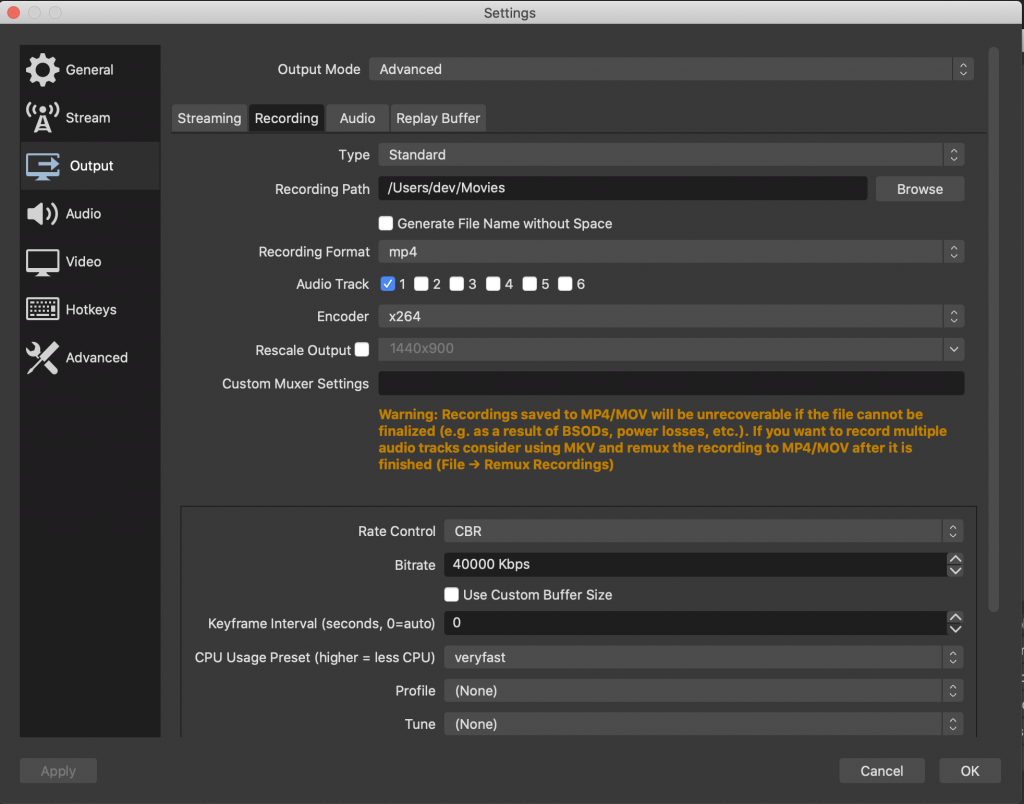
Below are the settings in OBS that remained constant throughout the tests. The two worth calling out are:
- bitrate set to 40,000
- cpu usuage set to “very fast”
Variable Settings
I manipulated two different settings over the course of these tests: “Base/Output Resolution” in OBS and “Project Resolution” in Final Cut Pro.
“Base/Output Resolution” Explained
Keep in mind that the native resolution of a MBP with Retina Display is 1440×900.
In OBS, you can set the resolution of your Base. Think of this like the size of your total canvas or workspace. Usually this will match the resolution of your monitor. The “Output Resolution” is the resolution OBS will export your recording as. This will usually be the same as your “Base Resolution” but it can also be lower (but not higher). The default for our test is 1440×900 (the resolution of our monitor). The exported video file will look as close to our actual screen resolution as possible.
The problem: 1440×900 is not a “normal” resolution. Go to Youtube and play with the resolution settings on videos. This resolution is never an option. If you just uploaded that file to Youtube it will preserve your aspect ratio but the best quality you’ll get is 720p. Your screen capture may not look as “sharp” as it does on your local file. Part of this is of course due to youtube compressing your file but lets play with some settings and see what happens.
We can change the Base/Output settings in OBS but we can also change our final resolution in Final Cut Pro.
Our experiment
Pro Tip: Whenever you start changing the “Base/Output” in OBS make sure you are “resizing” your screen capture to fit your canvas.
We’ll run through every combination of our two variables and compare the results at the end.
| OBS Base/Output Resolution | FCP Project Resolution |
|---|---|
| 1440×900 | 1440×900 |
| 1440×900 | 1920×1080 |
| 1440×900 | 4k |
| 1920×1080 | 1920×1080 |
| 1920×1080 | 4k |
If our display is 1440×900 what happens when we use a Base/Output of 1920×1080? Think of it like your screen capture sitting on a black canvas that is slightly larger than the capture. You wind up with a little bit of a black border around your screen recording.
Below I’ve provided links to all of my test footage. When watching, please make sure that Youtube is playing the video at the highest possible resolution.
- 1440 base, edited in 1440 project
- 1440 base, edited in 1920 project
- 1440 base, edited in 4k project
- 1920 base, edited in 1920 project
- 1920 base, edited in 4k project
Results
In my opinion, the best combination of settings was OBS set to 1920×1080 and editing in 1920×1080 project in Final Cut Pro. Editing in a 1440 Final Cut project does preserve the “look” of the screen capture but the text just isn’t as “sharp” as the 1920.
Why did we get these results? I think it has something to do with Youtube playing our 1440 project at 720p which would make sense we only uploaded 1440×900. Since 900 isn’t a thing it’s expecting the closest it can get is 720p.
Now that we’ve got our OBS settings for Macbook pinned down, let’s go record some tutorials!
